So the broken pumpkin inspired "Mr. and Mrs. Killjoy's Residence" (a scene suggested to me by my sister-in-law). First Mr. and Mrs. Killjoy ruined Independence Day by calling the cops on the neighbor who was shooting off the "good" fireworks that are banned in their state; then they convinced the HOA to cancel the Dog's Pool Day after Labor Day when the pools were scheduled to be drained; and now they were messing with Halloween!
I had some left over pieces of wood from a prototype of one of my Door Series Bookends (classes being offered at my miniature shop) so I used them to create the small space that would be the exterior of the house, door, and front yard of Mr. and Mrs. Killjoy. I used paint and static grass to create the yard and sidewalk leading up to their front door:
 |
| Had to glue my plastic tree down first so I could cover it's white "winter" base with paint and grass. |
 |
| Gotta yard! |
After I sprinkled the "grass" onto the wet paint, I sprayed it lightly with adhesive spray to help keep it in place. I removed the blue painter's tape and painted the sidewalk (yes, this would have been easier to do BEFORE I applied the grass -- hindsight is 20/20).
 |
| Painting the sidewalk |
The toilet paper in the tree is gift tissue paper cut into strips. The "rolls" were simply glued around a coffee stir straw and cut to be toilet roll size. Then I added the bush, step and door. But why would teenagers destroy Mr. and Mrs. Killjoy's only Halloween decoration (a carved pumpkin) and teepee their tree and egg their front door? A picture is worth a thousand words....
 |
| That sign didn't win Mr. and Mrs. Killjoy any friends |
I still have to create some egg shells to scatter at the bottom of the door but here is how I created the "egg" splatters on the door:
 |
| Dripped some yellow, clear, and "frost" color nail polish on a plastic sheet |
 |
| Some looked better than others... |
 |
| Once they were dry... |
 |
| ...I could slide my fingernail under them and... |
 |
| ...they'd pop right off to be glued where ever I wanted them. |
The QuickGrip glue actually began to disintegrate the nail polish creations which made them look more realistic/haphazard when I applied them to the door and bricking. Overall I had fun creating this little scene out of left over bits and parts I had lying around the house (except the door and bush: those I had to buy just for this scene).
Next blog update will still be pumpkin related as my witch is getting her pumpkin scene finished in time for Halloween!
Also, for those wondering and waiting: it's been 2 weeks and the water effect products are still under scrutiny...
 |
| From a distance... |
From 12" away (or even further back) all the waters look good! Any and all of them look like realistic birdbaths, except maybe the water in the painted bird bath -- it appears as though the blue paint is just glossy at first glance and you don't really see "water" in the basin. However, the photo above is taken indoors under "normal" lighting. Once I put them into sunlight, they didn't look quite as realistic/good:
 |
| The bubbles really show now |
Scenic Water (top left in photo above) really shows the bubbles in the sunlight creating shadows throughout the bird bath. The EnviroTex Pour-on (lower left and upper right painted birdbaths) looks cloudy with bubbles. And the Solid Water (lower left) has a tie-dye effect going on...
Up close (back under "normal" indoor lighting again) you begin to see the minor issues that are highlighted in natural sunlight and these issues were present when I first poured the products into their respective bird baths:
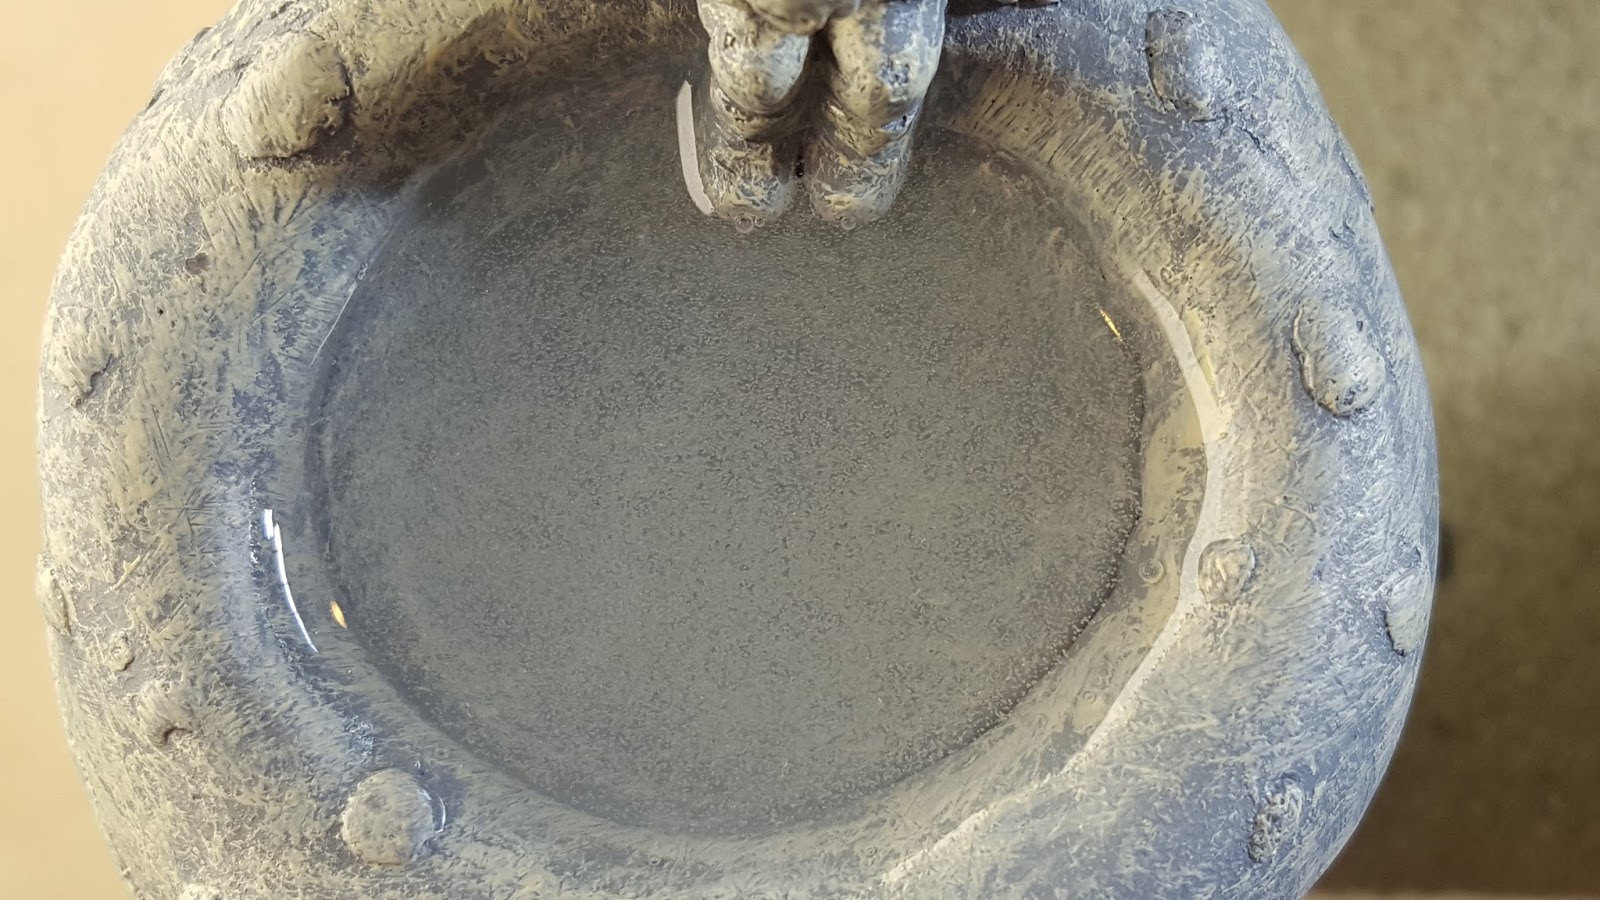
 |
| Scenic Water |
Scenic Water: Glad to see my bubbles at the side of the basin are still there and are clear (they didn't "pop" into a gooey mess). Several smaller bubbles are noticeable across the surface but they are not as distracting in "normal" lighting as they are in bright sunlight. These smaller bubbles formed when I poured the product into the basin. "Water" is clear, but definitely seems to have a yellow hue but so does one of the other products so maybe that is a reflection of the paint(s) in the basin and not the product.
 |
| Solid Water |
Solid Water: Definitely reacted with the paint(s) of the basin and created a tie-dye effect at the bottom. This "water" has a yellow hue too (like the Scenic Water). A milky swirl formed at the gnome's feet; not sure why or when that formed (I'd have to go back and review the first photos to see if it was there and I just missed it). Not one bubble anywhere!
 |
| EnviroTex Pour-On |
EnviroTex Pour-On: From a distance it seems the "clearest" but up close the millions of bubbles creates a hazy foggy appearance. These bubbles are partially operator error as I stirred the two compounds together quite vigorously to make sure they were mixed, creating a large majority of the bubbles now present in the basin.
 |
| EnviroTex Pour-On in Painted Basin |
EnviroTex Pour-On in a Painted product: Again, from a distance it seems to be one of the "clearest". In fact, the water is barely recognizable from a distance and it appears as though the blue paint was maybe just a high gloss finish. Upon closer inspection you can see the thousands of bubbles (I didn't mix this batch as vigorously as the previous birdbath's water). But it is not as hazy looking as the other EnviroTex Pour-On birdbath (however, I think that is a result of either the fewer bubbles or the painted bottom, but that would bode well concerning this product's characteristics).
None of the "waters" have cracked or shrunk/pulled away from the edges (yet?). Another update will be posted as more time passes...


Hi, Lori - You've created such a true-to-life Halloween scene; very well done. The egg yolks are amazing; a clever idea! Thanks for the interesting update on the experimental water projects.
ReplyDeleteMarjorie