Made a lot of progress on both my breadbox bakery and the Asian Butterfly Garden scene this past week (thanks to Mother's Day!). So I apologize for the lengthy post!
My Breadbox Bakery originally was supposed to be a bakery, but became an indoor/outdoor scene a few decades ago due to a sale on Magic Brick at my local mini shop. But someone asked why can't it be a bread shop with an outdoor area? So I started making breads to fill it (
Making the Bread) and now it needed racks for the bread...
 |
| Racks fit nicely! Bought the black one recently but mismatched white one is older and no longer available |
 |
| Older, smaller one bugs me that it's white when all other metals in the scene are black |
Racks were looking great, just needed to spray paint the white one black so that it matches and then the breads would "pop" on it.
 |
| Spraying |
And I didn't want to just pile breads on the shelves, so to add some color and interest I had to make cloth-lined baskets to hold some smaller rolls.
 |
| Large Basket getting cloth glued in place |
 |
| Lots of pins to hold fabric in place while glue dries |
Then I started to glue down all my breads I had made previously and my kids chalked on Easter!
 |
| Still need to chalk the breads that go on the top shelf |
 |
| We're just about ready for business! LOL |
I did decide it would look better with a center work table -- I would prefer a butcher's block table so I have to get one of those, but stuck this little table I had handy just to see if it would look nice. But overall, it's done!
 |
| Table does block French breads against back wall though... |
So as long as I had the clay, glue, and spray paint out, I also made some mushrooms and spray painted some wooden bowls to put them in. At first I made them just for fun and to maybe be put on some witch hutches to sell in my store, but I really liked some of the smaller ones so that means I have to make more to eventually end up in either my mansion, Irish Cottage, or Opie's house.
 |
| Undersides and tops are painted - trying to make it look as realistic as possible |
 |
| Ready for a witch's hutch/shelf |
 |
| Not sure why I spent so much time making the underside look realistic when no one will ever see it once it's glued on the shelf |
When uploading photos of my mushrooms I also found the cookies I had made out of clay and poppy seeds too. Couldn't remember if I'd shared it with you or not...
 |
| Even if you'd already seen these, no one complains about more pictures of cookies, do they? |
And, last but not least, I also worked on my Asian Butterfly Garden this week!!!! Weeks ago I had realized that my temple statue for the garden was too short. The bush in front of it hid it too much so it needed to be up on something. I tried various pots but the space was very limited:
 |
| When centered the pot hangs over the edges |
The best solution was to make a mold of the base of the temple and stack it. Bought this 2 part mold putty stuff.
Tested to make sure the metal of the temple wouldn't react with the mold material.
And once I knew it was safe, I wrapped the base in the putty, and waited the 20 minutes. I then pulled the putty off the base. After stuffing the putty cavity with clay, I let it set and cut the putty mold off, leaving behind a clay/plaster crude replica of the base of the temple. It was bright white and I had to paint it, but I think I matched the paint color fairly well. Now I do realize two things: 1. it would have been smart to have taken photos of all this to show you but apparently I'm not all that smart and 2. the base copy is not great and a lot of the details were lost in the mold, but from a distance I think it'll be ok and most of it will be hidden by other plants once the scene is done so I'm okay with it.
 |
| Copy on the left painted to match metal original on right |
I poured in the mud and arranged the large bush and temple on it's extra base. This side of the garden went off without a hitch!
Went over the left side of the Garden, which is where the headaches started.
 |
| Getting ready to put bamboo into mud |
 |
| And the fickle bamboo would not stand up! |
The bamboo stood up great in the Styrofoam it was packaged in, but in my 1/16" - 1/8" thick mud they would fall over. I tried using paper cups to lean them against. Once my glue mud set to "concrete" that would keep them in place. But until that happened I needed them to stay standing up straight!
 |
| Quickly got everything stuck in place but bamboo kept falling over |
 |
| Rigged to stay in place! |
After a lot of fussing with the bamboo I got them to stay upright. They are not all perfectly straight but I didn't want to fuss with it too much as fixing one seemed to make 4 others fall over! I took that picture and walked away from it for the night. By morning the mud was finally hardening! I was so excited! At work I showed Mom the photo and realized a huge mistake I had made. I'd glued the fountain bowls wrong and would have to take it apart and redo it. The bowls were supposed to go from smallest at top down to the largest on the ground. And I had glued the bowls to the wrong stands: the tallest stand was supposed to have the smallest bowl on it! And I couldn't just remove the bowls from the stand and swap them because the spacing would be wrong for the "water" to fall into the lower bowls. So not only did bowls need to be removed from the stands, but the stands needed to be moved around. And they were all glued down firmly to their stands and into the now-hardening-into-concrete dirt.
As soon as I got home from work I wiggled and chipped away at the bases of the fountain stands to get them out of the dirt.
 |
| YAY! Nothing broke! |
Neither my pottery or my wooden stands broke! Scraped away space for them so I could line them up properly again in the garden.
 |
| To make room for the stands the lower bowl needed to move just a hair over |
And that's when disaster struck: trying to move the lowest bowl over just a tiny bit and it's rim shattered. I now needed a new lower bowl.
 |
| This will do. |
Had a pot that would work, except it wasn't black. So back to spray painting I went! Once it was sprayed to match, I glued it in place and then got down to the business of making it a fountain (i.e. adding "water").
 |
| What I needed to make the spilling water |
Making Waves by Deluxe Materials is a great product for making "running water" either from a faucet, fountain, waterfall, etc. I had never done it before -- last time I made a fountain I used saran wrap dipped in Scenic Water but I needed/wanted something that didn't look as rustic as that previous waterfall had been. So, according to the directions, I just fill a syringe with this Making Waves material and it creates "running water".
 |
| Thick enough to hold up a straw |
Was nervous upon opening the jar (which I had opened a long time ago to make my sister a scene but ultimately did not use it for that scene, but it had been opened). It seemed so thick -- had opening it all those years ago caused it to dry up/out? It was malleable but not a liquid as I was expecting. But I stuck my syringe in and got to work.
Thick like a hardening toothpaste, it did drape and hang down as it was supposed to. Had to go slow so that it wouldn't break apart mid-stream. Although one did break but it was very easy to go back and just add to it. I was concerned that it was white. Bottle didn't say if it would dry clear or not but I kept on going...
 |
| Was pleased that thinner areas which were already drying were turning clear. |
I let it dry for hours. Still needed to add the pools of water to the bowls but wanted the drippy stream parts to dry fully before I did that. And in the meantime I started to glue down butterflies. And was disappointed that my large collection of butterflies were mostly transparent and unseen unless against a white background:
 |
| In their packaging they looked so colorful! |
 |
| But so transparent in the scene you can't see them. |
 |
| Even the gray stone doesn't make this one stand out as much as I'd like |
 |
| The one on top of the temple looks great cuz white wall behind him shows off his details. But would you have noticed the one on the leaf if I hadn't circled him? |
So I ended up using more of the paper butterflies I had. I wanted some "flying" around her but as I put the "invisible" wire in the scene it bugged me that it was so "not invisible"!
 |
| Awful, obvious wire. |
 |
| Could he be any more obvious?!?!?! |
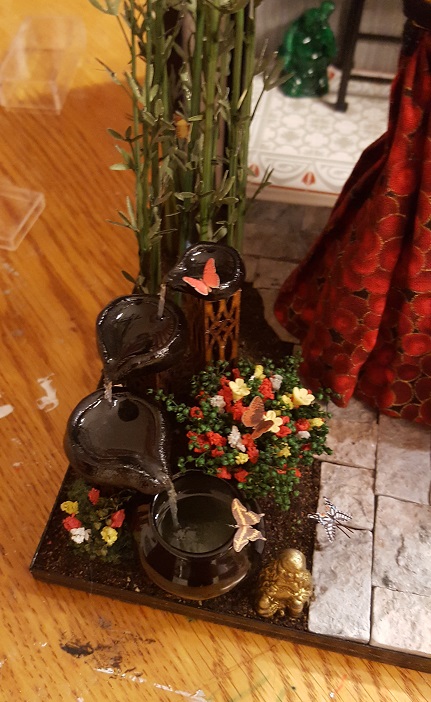
So most of my butterflies will have to be "grounded" and not flying around...And, now that "streams" were dried and clear, it was time to mix the 2 part resin (Solid Water by Deluxe Materials) and fill my bowls:
 |
| 3 paper butterflies around the fountain |
And as long as I had the resin mixed up I added some to glass pitchers and stuck greenery in them to create some herbs for tables/shelves to sell in my store:
Still working on making stuff for the tables/shelves, such as this pastry blender which needs more work/perfection but for a first attempt I was okay with it.
 |
| Piece of toothpick |
 |
| Hole drilled into either side |
 |
| Bits of wire |
 |
| Attached wires into holes |
Having made the one, I can now think of ways to make it easier/faster (a bigger drilled hole is a definite next time!). Still need more pottery, books, and kitchen utensils, but working on these tables/shelves during the next week or two and then they'll be for sale in my store:
 |
| One of many that will finished soon |
 |
| Have white and black shelves to fill! |
And, in the next week or two I will also be getting to the laser cutter to cut my Shoji doors. I know I've been saying that for weeks (months) now, but things (i.e. real life) keep getting in my way and preventing me from getting to the warehouse where the laser cutter is kept! And the "roof" of the structure needs to be painted black (once Shoji doors are installed) and I need to put crossbeams of some kind across the bracket supports, but otherwise the Butterfly Asian Garden is completed!
 |
| Those "in flight" butterflies might get yanked out -- I really don't like seeing that wire. |
So, I am sorry for the lengthy blog post, but as you can see I had a lot to tell you about! Hope to be even more productive in the next month!