One thing the Chicago Show taught me is that I need to be making some of my mansion stuff because I'll go broke trying to buy it all. This past month (in addition to customers' projects) I worked on finishing the lower cabinets for the Butler's Pantry (
First post about work on Butler's Pantry cabinets) and the Hanging Pots & Pan Rack for the Kitchen. I also fussed with the library ceiling, but it is not turning out the way I want so I will continue fussing with that until I am happy and post about it later.
I fell in love with the Getzan's pots and pans hanging racks at the Chicago Show, but couldn't rationalize spending so much on one piece -- a piece that isn't even the large size I'd need for my industrial (almost commercial) size mansion kitchen. So . . . time to make my own!
I purchased strip wood, swivel plant hangers, some chains, and most importantly: the new pot and pan wall hook plaque by Reutter Porcelain.
 |
| Chains and Swivel Plant Holders. |
 |
| Beautiful pots and pans and a wall holder for them - which I will glue to my hanging rack! |
Using strip wood I created a rectangular outer frame and I cut several crossbars to create an open rack between the rectangle frame edge pieces:
 |
| Step 1: creating the frame work |
 |
| Step 2: cutting the bars to create the rack |
Using scrap pieces of the strip wood I glued the cross bars to the frame:
 |
| Step 3: Gluing |
 |
| Step 4: All glued together! |
Then I spray painted it all black.
 |
| Step 5: First coat of paint |
Added some metal scroll work (it's actually the swinging plant holder by Island Craft Miniatures - available at your local miniature shop). I bought 4 of the plant holders and used super glue to attach 2 on each side:
 |
| Step 6: Glued on the scroll work pieces to attach chains |
Another spray of black paint and then I added the gold hook plaque. The gold hook plaque came with the Reutter Porcelain pots and pan set. I bought 2 (one for each side of the rack) and now I have a full assortment of metal pots and pans!
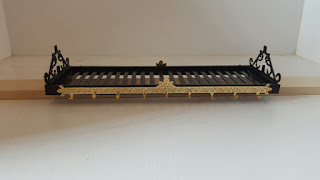 |
| Step 7: Gold hooks are glued on |
The fine chain was from Heidi Ott and it fit right thru the remaining piece from the swivel plant holder! So, once my kitchen is complete, the black holders get glued to the ceiling and it's done!
 |
| Step 8: Chains are attached to black bars that will be glued to kitchen ceiling. |
My kitchen ceiling heights are at 13-1/8" high so this pot racks looks to be hanging low in my work box, but it will fit perfectly once the kitchen is finished (fingers crossed!). Finished pics with all the pots and pans:
 |
| Finished with pots and pans on it |
 |
| Finished rack |
 |
| View from the side |
Now I also worked on finishing up the Butler's Pantry lower cabinets:
The Butler's Pantry will store all the dishes, linens, and everyday silverware (the real silver would be locked up in a safe). I had previously disassembled Bespaq pieces to get my linen and silverware drawers (the lower cabinets). Now I had to glue them together and add stripwood to cover the gaps and uneven cabinet heights. Plus it needed a new countertop since they didn't have one.
 |
| Cutting and gluing the wood needed to fill in the gaps and height discrepancies. |
 |
| Stripwoods are in place, and new countertop cut to fit. Still need to fill in the back wall window hole! |
Now counters and cabinets are all stained the same color (Mahogany) and once the stain dries a full 24 hours I will lightly sand it with a paper bag (finest sand paper there is, other than your hand!) and polyurethane it to a gloss finish. But essentially it is finished:
Now to continue working on the library ceiling and electrical! My middle daughter loves to prime and she started to prime the house for me: one room is primed and ready for the electrical wires:
 |
| Lady's Bedroom is primed! |
I really want to start the electrical before a business trip I have to take on August 22nd so that if I run into any issues with the 12 channel remote control I can discuss it with the maker (Creative Reproductions 2 Scale) when I see him on the 22nd. Wish me luck!


Hi, Lori,
ReplyDeleteYou've made a lot of progress since your last post! The cabinets for the butler's pantry are wonderful. You did such a good job "restructuring" them. And you gave me a helpful tip: I've never known about sanding with a paper bag, but I'll definitely try it soon. I'm also very impressed with the hanging pot rack. Very innovative with beautiful results. Nice work!
Marjorie
Thank you Marjorie!
DeleteLori this is fabulous! Love, love the pot rack and the cabinets are spectacular!
ReplyDeleteThanks, Heidi! I'm working now on creating the dishes for the upper cabinets (Using True to Scale decals on plastic dishes since it's just filler dishes that will reside in the cabinets) and trying to finish off the library ceiling to my satisfaction so that I can move ahead on the electrical.
Delete