Welcome to my life . . . .

This is a blog about my passion: dollhouses and miniatures. This particular blog was started to follow my miniature dream: to create a Victorian Mansion. But work on my Mansion is slow. Very slow. Sloth slow. Ice Age glacier movement slow. Why? Because I am easily distracted by other personal miniature projects (I have 50+ roomboxes and 15 dollhouses in various stages of incompletion) and because I work for a miniature shop and am often up to my elbows in miniature projects that aren't mine! So, I thought, some artists work in a particular medium (woods, watercolors, clay, oils, etc.), I work in progress . . . .

Saturday, March 13, 2021

Creature comforts in the Hunting Cabin

I always have issues with finding small fridges (like dorm size fridges) for my dollhouses.  I needed a small one for my beach stall and ended up having to make it (Beach Stall Post).  And this fridge for my Hunting Cabin was causing me the same issues.  I had bought a regular fridge and stove for the Hunting Cabin kitchen and there just wasn't enough space so I have since removed both of them.  But I never found a smaller fridge to replace it with.  So, time to make one!

Scrap wood glued together
Had some scrap wood that I cut to the approximate size (based off of a real dorm size fridge for sale at a Home Improvement store).  Then I glued it into a box shape and spray painted the base black.  The front "doors" of the fridge I spray painted silver (to resemble stainless steel).

Spray painted and glued together
Glued the doors to the fridge because no one will ever know if it opens or not (except me) but it still didn't look finished.  Just looked like a box.  So I searched for some scrap wood trims to paint silver and turn into door handles and it was done:
Coffee maker and eventually a crock pot will store on top of the fridge

Door handles make it more realistic, even if it doesn't open

Small little fridge chillin' in the corner

So my Hunter can now bring some milk, cheese, frozen Hungry-Man dinners, etc. to the cabin for weekend meals!

Next up: I wanted to make the Hunter a relaxing area (it rains some weekends and then hunting and fishing might not be options).  There was always a TV for entertainment but the mantle on the fireplace just wasn't big enough for too much more.

Entertainment area before
So the mantle had to be expanded.  First attempt was the wrong stain match; I thought I could fudge the stain color since I couldn't find the original Dark Walnut stain I had used and I thought Antique Walnut with a dry brush of Ebony would work ok, but it was obviously different:
Such an obvious addition on top

So I cut the crown molding again and another strip wood to be the top of the mantle and bought another jar of the Dark Walnut stain.  Stained the new pieces and glued them in place (and promptly found my old Dark Walnut stain I couldn't find prior which sparked the whole "I can make it work with these other stains" debacle).  But now the TV, DVD player, sound system, and Playstation fit on the mantle!

I love the gaming system I found from this Canadian seller on Etsy (Etsy Seller MiniMonday3). The detailing is so great:
Now I need some games to stack up there too


So my Hunter has some creature comforts while enjoying a weekend vacation.  And speaking of creature comforts, that poor puppy needs a water bowl, food bowl, and dog bed too!  I'll take care of that tomorrow.

Then I just need to finish up the kitchen (ditched the traditional sized stove at the same time as the traditional size fridge so now I need to make a microwave cart to hold the microwave the Hunter cooks in as well as the electric grill that is also used to make weekend gourmet meals such as mac-and-cheese casserole! LOL) and I need to tackle the landscaping!  This project is so close to finally being finished!  Now I just need to resist the urge to start a new project when I have so many others waiting to be worked on!

Thursday, February 11, 2021

Hunter's Cabin

This little house was supposed to be a run-down cabin in the woods, but things kept getting nicer and nicer (especially in the bathroom) so it's become a hunting cabin in the woods that the hunter is slowly renovating so (s)he can retire and live there one day.  But, for now, many aspects of the house are still rustic, and the hunter is basically living a glorified camping lifestyle when hanging out there on the weekends.

The kit was a Real Good Toy's Keeper's House (aka Cape Cottage Jr.) that I modified to have a foundation, a chimney, and some ridiculously small front steps.

Originally I thought I would finish the kitchen and foyer area today (thanks for the snow day, Mother Nature!). But I ran into an issue - mostly being that the stove was too big and too nice for the kitchen.  So I need to find a more rustic, smaller stove (like a Coleman camping stove).  So, I worked on finishing the shower instead...

About a decade ago I had created this shower stall out of balsa wood:

I installed it into the house:
At some point in time I even wallpapered it with "tile", painted the room, and installed flooring!  It just needed a shower head, shower valve (the handle to control the water coming out of the shower head), a rod, and the shower liner.

I had an old broken whisk that had the perfect wire for the shower curtain rod.

Used my wire cutters and needle-nose pliers to cut and shape it more into a curved rod.  My next issue was finding a fabric that looked like a plastic shower liner.  But nothing really looked right.  Fabrics look like fabric (and we know fabrics and I don't always get along!).  I really wanted something that had the slick, plastic look of a vinyl shower liner.  So why not use actual plastic?  I cut up a plastic grocery bag into a 6" x 5" rectangle and put a piece of tape over the "top" edge to reinforce it.

Used my paper punch to create little 1/16" holes at the top, strung the liner onto my rod, and used an earing rubber stopper to hold liner in place.

Since I couldn't fit my drill into the bathroom (years ago some genius went and glued the shower in place already) I had to use a tack to make my holes and stuck the rod into the holes.

I always have and use the best tools. LOL

So the shower liner and rod are in place! (Technically it needs a tiny piece of sliver where it goes into the hole so I have not glued it yet so I can add that when/if I find something that will work.)

Glued the shower head and valve in place and THE SHOWER IS DONE!


As you can see in the photos above, I turned on the electricity once the shower was done - to discover that at some point in time in the last few years, the fireplace stopped lighting up.  And of course the wiring for it involved me sticking my entire head into the dollhouse and turning my head at odd angles.  I eventually gave up trying to access the wiring in the chimney and drilled a hole to beneath the house and ran the wires to the tapewire accessible right by the junction splice (much easier to get to!).  After an hour with the fireplace wiring, I did get the flames working again.  Now to attempt to make a Coleman camping grill for the kitchen, and work on creating a proper mantle to hold the TV, DVD player, sound system, and PS4 that I want to make for my hunter....

Puppy is so happy his fire is back on to keep him warm on this snow day!

Tuesday, February 9, 2021

Miniature Snow Days

Even though our county is Distance Learning, we still get snow days off from school!  So when Mother Nature blessed us with a few inches of snow, I got two days to play with miniatures!

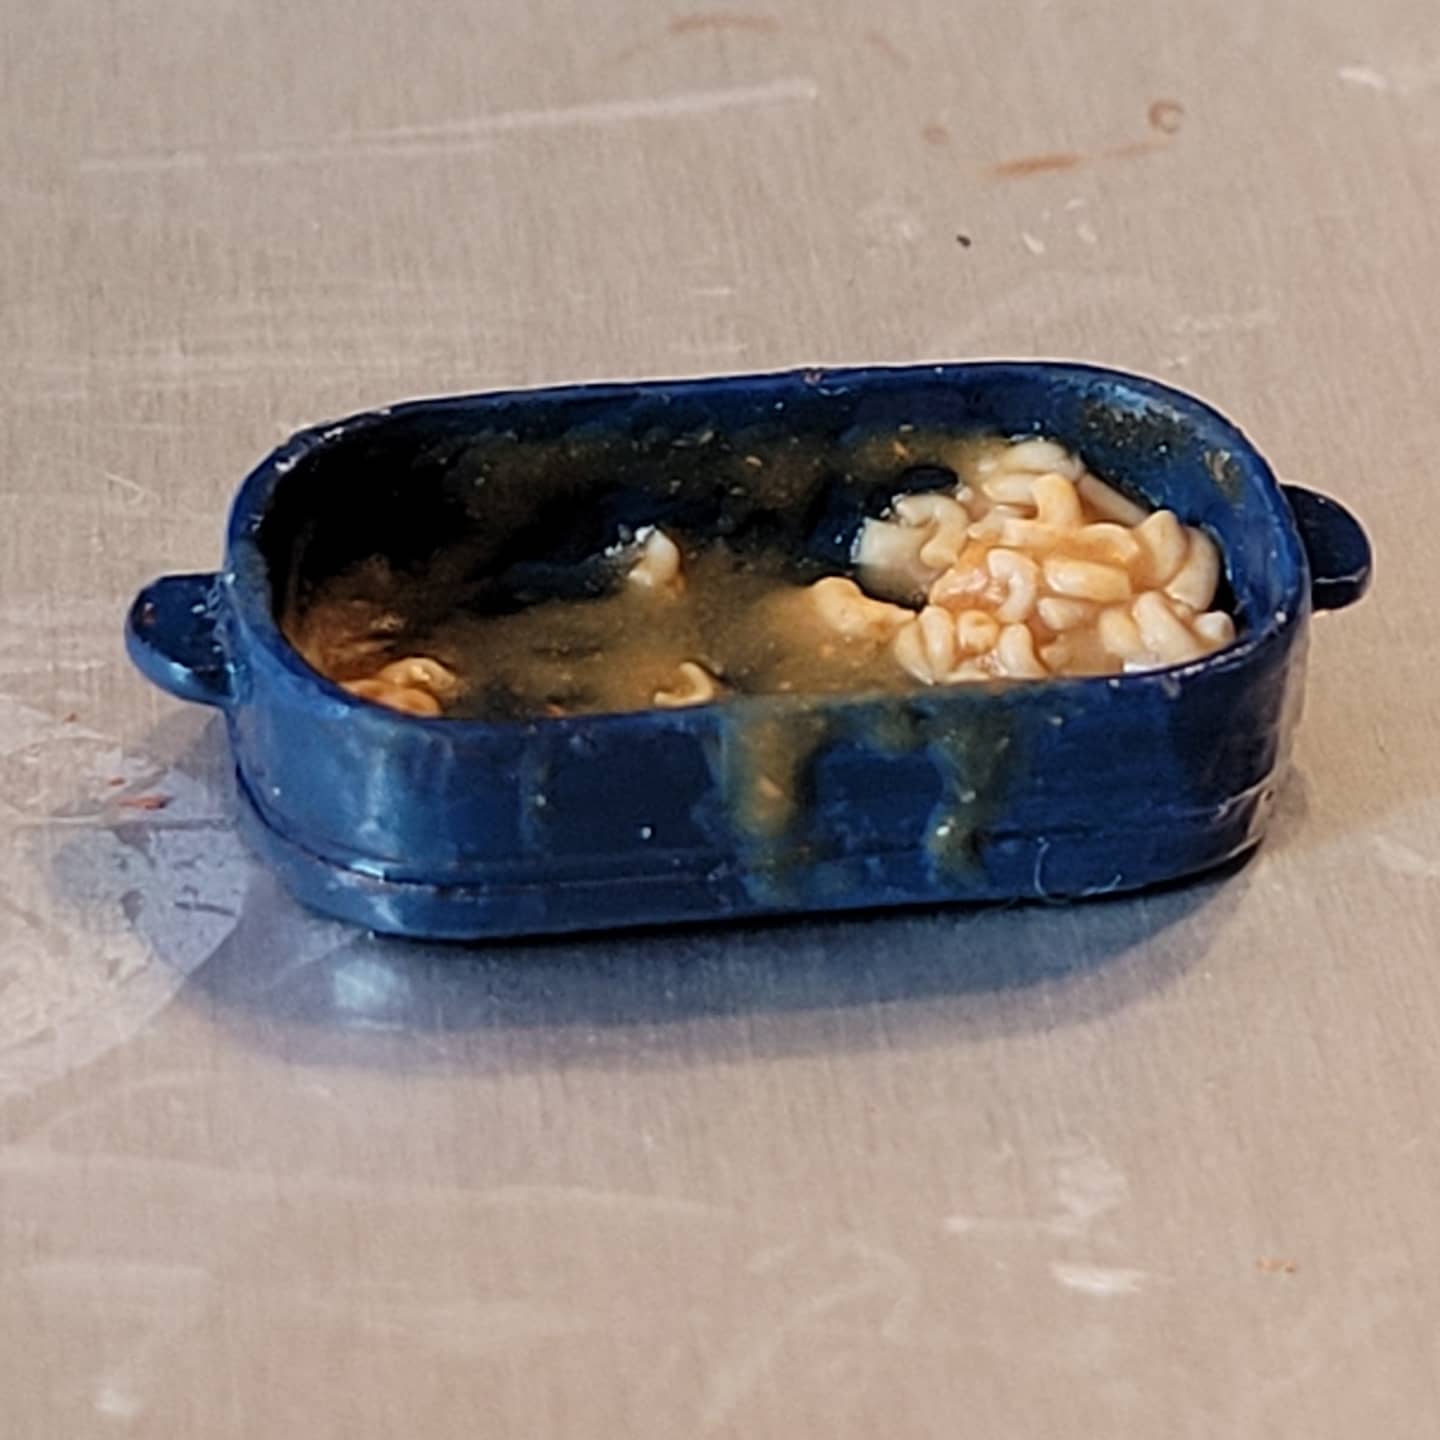
I've been wanting to make a partially eaten pan of left out mac and cheese for years. It's for my hunting cabin: I could envision my hunter making a mac and cheese casserole and then eating it straight out of the pan (why dirty another dish?).

First I had to make the elbow macaroni:

Used "Champagne" color FIMO to make the noodles. Then I added some yellow and orange chalk to the liquid sculpty and made the cheese sauce...

I was so happy to finish this little project that has been in my head for years now!  Now I need to bring out my Hunter's Cabin and work on that for a bit so this left out mac and cheese can be put in it's place.

Next up I wanted to make some candies for my candy shop. Using a Ruth Stewart mold (Stewart Dollhouse Etsy Shop), I created a handful of wrapped candies to go in a glass jar on the countertop in the Cottontail Confectionery (the candy shop).


Naturally, since I was playing, my kids wanted to join in. My youngest made some Madelines (also from a Ruth Stewart's mold). She makes these cookies in real life and now she's made them in miniature.


My eldest daughter had to play too so she made me some swirl stick lollipops for my Cottontail Confectionery (the candy shop).

Then she played around with the clay and the exacto knife, and she created mini bits of coral! Perfect for a fish tank!


I had purchased a mold years and years ago from Vilia Miniatures (Vilia's Etsy Shop) and decided to play with it today:

I was not particularly impressed with the strawberries, but loved the raspberries, blackberries, cherries, and blueberries (forgot to photograph them) that I was able to make with the mold!  I will be using these on a cake I want to make in the future.

The other food project I had rattling around in my head for years has been the dessert waffle.  I have seen some pancakes and waffles with syrup before, but in my mini world, I want my waffles with ice cream, chocolate sauce, and fruit (hmmm, maybe some of those fruits I made above need to go on a waffle....).  I had purchased this waffle mold a few years back from Ruth Stewart (Waffle Mold).  This was the perfect day to play with it!

I made some scoops of ice cream by just rolling a little ball of white FIMO and wrapping it with a snake of white FIMO.  Then I used a pick tool to create the lumpy marks on the snake part to meld it in with the scooped part.
Not everyone likes dessert waffles though, so I made a few "traditional" waffles - just needed a few pats of butter!
Used Ruth Stewart's syrup (Link To Purchase the Syrup) to create the traditional waffles.  Although my friend says there needs to be a lot more syrup on them. LOL
My dessert waffle with chocolate sauce and a cherry.

And as long as I was getting to play, I had a mold to make mini legos and a 3D printed lego blocks that needed to be painted.
Perfect for a toy room!
It was so nice to get a few little projects done - it's been a while since I got to play with my minis.
Rumor has it more snow is coming later this week so I brought my Hunter's Cabin up from the basement to the dining room so I can work on it if we get some more snow days off from school!

Friday, December 25, 2020

2 year long Birithmas Gift

 Last year I was so busy closing up the shop that I didn't have time to make my friend her Birithmas (mix of Birthday and Christmas) gift.  I knew what I wanted to make her; I had even bought most of the supplies to do it in early 2019.  I just didn't have the time.

Several years ago I made her THIS (click to read blog post about making the box) for Birithmas:

One side of the Birithmas Gift from years ago:
Large Shop Window to be decorated

When I gave her the box 3 of the sides had been decorated. Side 1: Tiffany & Co was painted and designed - my friend just needs to fill the window with jewelry and stuff.  Side 2: We contacted our friend Tish to make a doll for the Queen of Heart's large window display (Link to Post about Other Large Shop Window).  Side 3: And the flat side of the box had been decorated with Broadway Show posters.  Which only left this one window left to be decorated.

I knew friend loved this real life New York City florist window display (from her New York city trip in 2015):

Lots of roses....

So I wanted to replicate something similar for her in miniature.  Plus add a few touches of my own (the miniature window is slightly larger than the real life window so there will have to be more in the window than just the dress and gift boxes).

First up was a reindeer that my friend was giving away.  She got this for a project and then didn't use it.  So I told her I could use it (she didn't know it was for her own gift):

Scrawny little reindeer

Started to fill him in with some lycopodium:
He's got a bushy butt!
Um, did he just become Max from the Grinch?

So once I glued lycopodium to him to fill and fluff him out, he started to look more like a dog than a reindeer!  I was so disappointed and lost my momentum for working on the project.  He sat around my dining room table for a month or so, my little reindog.

Then November hit and I realized I hadn't even started the other projects that would go into the window scene and I was going to miss out on getting my friend a Birithmas 2020 gift!!!  Unacceptable.  So I dragged Reindog out and contacted my friend's mother for advice: keep Reindog as a dog (friend loves dogs!) or bite the bullet and glue antlers on him and hope that converts him back into a reindeer?
Reindog reigns supreme

He still looks a little doggish to me, but friend's mother says the antlers make him look enough like a reindeer. (The antlers were cut off of a rubber/plastic reindeer toy.)  But it wasn't quite enough.  So I increased his reindeer-ness by adding some Christmas decorations to him:
Poor thing looks like Christmas sneezed on his head

Project #2 for the window scene is a shelf unit filled with goodies.  However, I wanted friend to put some of her own style into the window scene so I only added a few items to the shelf (which she can move around, take out, or glue down once she decides what she wants on the shelves).  I added some "garland" (sparkly pipe cleaners) to the edges of the shelves and it was done:
Simple, Quick, and Easy Project: I needed that after Reindog!

Riding high from that success I jumped right into Project #3: The Lamp Post!
Sort of plain looking: needs some Christmas!

I had various bits and pieces that would dress this up, such as more sparkly pipe cleaners, ornaments, flowers, and...
Lanterns...

bare trees...

and a sparkly reindeer

I made the sparkly reindeer from a brown plastic railroad accessory.  Spray painted him white, smothered him in white glitter, and glued no-hole-beads to his antlers.  It was like a pampering day at the spa, sort of.  So I glued my bits and pieces to the lamp pole:
Hung larger ornaments and glued smaller ones to the lamp post tray

Lantern and reindeer (bare trees got ornaments and a star topper)

Added a candle to the top lantern and flowers to the bottom basket area and it's done!

Now came the main attraction: the Rose Dress.  I was scared to tackle this project due to my Past Experience with dressing dolls (and really a mannequin is just a headless/armless doll!).  Dedicated a Saturday afternoon to it and came up with:
Don't ask me what those arm holes are doing; they look scary. That's tomorrow's problem.

Not bad from the front.
So, it took me three different design attempts and there were some glue spots on the fabric that I'm not happy about, but this was an acceptable start to a bodice and my patience was stretched thin.  Time to stop for the night (which became a week).

A week later I forced myself to try the skirt part.  And, like the bodice, it took me about 3 or 4 design styles before I got to something semi-decent enough to glue to the mannequin.  It did not help that apparently I like fabrics that look pretty, but are a pain in the butt to glue and sew (yes, one version of the skirt involved my using a needle and thread!).
Have some side skirts happening. Middle is still a bit drafty.

Now has a back skirt in place

Had a 2 or 3 hour debate over how to join the side skirts to the back skirt.  Only solution I could come up with was to glue over them to keep them together.  So I glued the only coordinating ribbon I had over it (a black and gold ribbon) and thought, "I can't give this to her; it looks sloppy with weird trims/ribbons on the back that won't match the white trim in the front, odd size arm holes, uneven seam and hem lines, and I haven't even attempted the roses yet".  I wasn't going to cry, but felt despondent enough over how it was turning out that I wondered what gift I could just buy for my friend because this dress wasn't looking good enough to give to her. Then my eldest walked by the table and said, "Did you make THAT? It looks nice!" And just like that my confidence and momentum returned!  Sometimes all it takes a compliment to keep you going.
The "nice" enough dress

So I glued white bunka trim to the front of the dress:
Arm holes are looking better now

And cut some red aida cloth to fit the front of the skirt for the roses...
Luckily I had bought 3 packs of roses (for a total of 150 roses) for this project!

Glued aida cloth to the mannequin and finished filling in flowers

Now that dress is done, I had to work on the blanket of flowers at the mannequin's base.  I wanted the blanket of roses to be separate though because 1. that will be easier for shipping this from Virginia to my friend in Texas and 2. the dress was looking so nice, I didn't want to screw it up with the blanket of roses looking badly so if it's not connected to the dress, I could still ship the dress to my friend and feel like I had a respectable gift for her.

Glued some foam to a piece of cardboard (to get a "rolling hill" effect like in the photo).

Roses spilling out in front of the dress in real life shop window

My foam base for my blanket of roses

I started to glue roses to the foam (just left of center in the back by the dress) when I realized that I should paint the foam red in case there are gaps!  After painting it red, I started to glue the roses to the foam.  And then I started to hyperventilate since I THOUGHT 150 roses would be enough, but I was running out!  I stuck some larger roses in that were "red" and not "deep red" like the other roses but I couldn't think of what else to do.  And now the edge that was supposed to be covered in roses, was just a raw foam edge because I was out of roses.  I debated about covering the edge with a strand of the sparkly green pipe cleaner garland (that would coordinate the dress to the other pieces in the scene) but I really didn't want to do that.  Then youngest asked, "Why can't you just cut off the excess foam edge and paint what remains red?"  Brilliant!  Simple solution!  Can't believe I wasted 2 hours brain storming this and the solution was so simple!  Thank goodness I have smart kids.
Dress and removeable blanket of roses

So the scene is now complete and fits into the window space (I had a template of the Large Window Shop so I knew exactly how much room I had to work with)!
Front and center is the dress and blanket of roses

The larger and lighter roses actually make it look realistic since roses aren't all the exact same size and color.

My reindog and lamp post

Wish the lamp post was more visible but the main focus is supposed to be the (roses) dress so...

The shelves with snow globes and a snow white village scene by MagnoliaMinis


Entire window

It's the first week of December and all the gifts are wrapped and packed for shipping and by the time I post this she will have opened them (can't post until after she opens in case she reads the blog before she's opened her Birithmas Gift)!  Took me 2 years, but I finally finished her rose dress!

Hoping you all are having a rosy winter!  Stay safe everyone!