Welcome to my life . . . .

This is a blog about my passion: dollhouses and miniatures. This particular blog was started to follow my miniature dream: to create a Victorian Mansion. But work on my Mansion is slow. Very slow. Sloth slow. Ice Age glacier movement slow. Why? Because I am easily distracted by other personal miniature projects (I have 50+ roomboxes and 15 dollhouses in various stages of incompletion) and because I work for a miniature shop and am often up to my elbows in miniature projects that aren't mine! So, I thought, some artists work in a particular medium (woods, watercolors, clay, oils, etc.), I work in progress . . . .

Friday, September 18, 2015

Real Good Toy's Holly Hobby House

I'm so disappointed that when I went to look for the "before" photos of the Holly Hobby House I realized that they were on my old camera which was lost.  So, the only photos of this house I have are from my previous post when I worked on it's electrical back in March (Holly Hobby Electrical).

But, regardless of whether or not I have the "before" photos, the customer's Holly Hobby dollhouse is finished! Customer had previously made adjustments to the kit, making the front door flush with the house, and she had already painted the exterior.  For the front of the house we just needed to add the roof, alter the chimney (which she wanted turned a different direction from how it came in the kit), and install the coach lights.

I will miss this house not only because it was a nice structure to be working on, but also because the customer was a delight to work with and she came in frequently this past month to work on her house with me.  The customer wanted to do as much of the work as she could (isn't that the best part, when you can say, "I did that!"?).  So she visited to discuss flooring, stained them all, and took the kitchen floor home with her to paint; she painted and stained the stair parts; she picked up the cut window and door trims to take home and paint; she dropped by to brainstorm bathroom decors and then she created beautiful subway tile trims for her bathroom out of scrap woods; and towards the end she hung out with us having coffee while she shingled the house.  It was nice to have company while working on her house . . . .
One of the few "In Progress" pictures I have: The Living Room

AFTER: The Living Room
The Living Room will get table or floor lamps someday.

In the foyer we added a little wall under the stairs for her (stairs she painted and stained, but had us assemble as the layers of paint and swelling of the wood made the spindles not fit into the treads properly so she had us do that part).  I thought the little wall was a cute idea and allows for her to create either a closet or a display nook under the stairs if she desires.  If the stairs weren't so steep she could have gotten a powder room under there:
With the wallpaper on it, the little wall blends in.
Little space under the stairs as seen thru front door.
AFTER: Finished Foyer.
I love her fixtures and flooring in the bright and cheery kitchen!  The flooring is random plank that the customer painted in a checkerboard pattern.  It had a country, cutesy feel.  This kitchen pops:
AFTER: Kitchen
Now, the two biggest accomplishments (in my opinion) that the customer should be proudest of is the bathroom and the shingling.  This customer is new to the hobby.  But obviously is very creative and had a vision of how she wanted her dollhouse to look.  She wanted the third floor enclosed.  She originally asked us to just glue roof panels on the front and back and shingle them.  But we pointed out to her that she could use the space up in the attic, even if she doesn't "finish" the rooms to be usable display space, they could still be storage space.  So instead of enclosing it and wasting the space let's put a hinge on the roof and then her options were left open.  She loved the idea.  So we cut the wood and installed the hinge and gave her basic instructions on how to shingle.  And she rocked it:
I think the roof looks seamless: Can you figure out where it opens?
Back Roof opens to reveal more space she can use as storage or decorate in the future.
The second accomplishment (as I mentioned above) was the bathroom.  It seems minor to be so impressed by trim, but it is the trim that makes this bathroom.  And aren't we all in this hobby to appreciate the small details that make a room look more realistic?  Her vision for the bathroom was spot on and made the bathroom my favorite room in this house.  The bathroom chair rail trim was slightly curved chair rail woods and the baseboards are scrap strip woods the customer painted to resemble subway tiles:
AFTER: Hallway and Bathroom
AFTER: Hallway and Bathroom again.
These are the other rooms we wired, wallpapered, and finished (installed flooring and trims) in the house:
AFTER: Master Bedroom

AFTER: Nursery
I will miss the house and the excitement of helping and discussing decor ideas with the customer.

But I think the customer was bit by the hobby bug and will most likely be back soon, perhaps even for another little house or roombox . . . .


Friday, July 31, 2015

Mansion Detailing (Pot Rack and Butler's Pantry Cabinets)

One thing the Chicago Show taught me is that I need to be making some of my mansion stuff because I'll go broke trying to buy it all.  This past month (in addition to customers' projects) I worked on finishing the lower cabinets for the Butler's Pantry (First post about work on Butler's Pantry cabinets) and the Hanging Pots & Pan Rack for the Kitchen.  I also fussed with the library ceiling, but it is not turning out the way I want so I will continue fussing with that until I am happy and post about it later.

I fell in love with the Getzan's pots and pans hanging racks at the Chicago Show, but couldn't rationalize spending so much on one piece -- a piece that isn't even the large size I'd need for my industrial (almost commercial) size mansion kitchen.  So . . . time to make my own!

I purchased strip wood, swivel plant hangers, some chains, and most importantly: the new pot and pan wall hook plaque by Reutter Porcelain.
Chains and Swivel Plant Holders.
Beautiful pots and pans and a wall holder for them - which I will glue to my hanging rack!
 Using strip wood I created a rectangular outer frame and I cut several crossbars to create an open rack between the rectangle frame edge pieces:

Step 1: creating the frame work
Step 2: cutting the bars to create the rack
 Using scrap pieces of the strip wood I glued the cross bars to the frame:
Step 3: Gluing
Step 4: All glued together!

Then I spray painted it all black.
Step 5: First coat of paint

Added some metal scroll work (it's actually the swinging plant holder by Island Craft Miniatures - available at your local miniature shop).  I bought 4 of the plant holders and used super glue to attach 2 on each side:
Step 6: Glued on the scroll work pieces to attach chains

Another spray of black paint and then I added the gold hook plaque.  The gold hook plaque came with the Reutter Porcelain pots and pan set.  I bought 2 (one for each side of the rack) and now I have a full assortment of metal pots and pans!
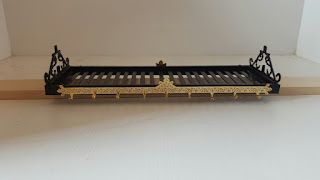
Step 7: Gold hooks are glued on

The fine chain was from Heidi Ott and it fit right thru the remaining piece from the swivel plant holder!  So, once my kitchen is complete, the black holders get glued to the ceiling and it's done!
Step 8: Chains are attached to black bars that will be glued to kitchen ceiling.
My kitchen ceiling heights are at 13-1/8" high so this pot racks looks to be hanging low in my work box, but it will fit perfectly once the kitchen is finished (fingers crossed!).  Finished pics with all the pots and pans:
Finished with pots and pans on it

Finished rack

View from the side
Now I also worked on finishing up the Butler's Pantry lower cabinets:
The Butler's Pantry will store all the dishes, linens, and everyday silverware (the real silver would be locked up in a safe).  I had previously disassembled Bespaq pieces to get my linen and silverware drawers (the lower cabinets).  Now I had to glue them together and add stripwood to cover the gaps and uneven cabinet heights.  Plus it needed a new countertop since they didn't have one.
Cutting and gluing the wood needed to fill in the gaps and height discrepancies.
Stripwoods are in place, and new countertop cut to fit.  Still need to fill in the back wall window hole!
Now counters and cabinets are all stained the same color (Mahogany) and once the stain dries a full 24 hours I will lightly sand it with a paper bag (finest sand paper there is, other than your hand!) and polyurethane it to a gloss finish.  But essentially it is finished:


Now to continue working on the library ceiling and electrical!  My middle daughter loves to prime and she started to prime the house for me: one room is primed and ready for the electrical wires:
Lady's Bedroom is primed!
I really want to start the electrical before a business trip I have to take on August 22nd so that if I run into any issues with the 12 channel remote control I can discuss it with the maker (Creative Reproductions 2 Scale) when I see him on the 22nd.  Wish me luck!


Thursday, July 23, 2015

Revist the Celerity Little Molly

We finished the Celerity Little Molly ahead of schedule making the end of June deadline easily!

However, the customer came in to get her dollhouse and decided she loved the wallpapered rooms so much that she wanted us to wallpaper the other rooms which were only primed and left for her to paint in the future when she had time.  So she picked out a few more wallpapers and I got to work installing those papers, cutting and installing some window trims and some doors, and staining/painting the stairs.

I actually finished this job 2 weeks ago, but a storewide sale and my own personal projects kept me distracted and unable to finish this blog entry!  I keep trying to figure out how I can cram 39 hours of work into the 24 hours God gives me in a day!  So far I haven't had any success with that; then again, I was never a genius at math so I keep trying to make it work.

The top right attic room got wallpapered to coordinate with the left side of the attic:


I tried making a template for the slanted wall that is papered with a white textured liner, but it ended up being easier to just stick the paper in there and cut and fuss with it around the wall divider instead of taking the time to create a template. 

Both hallways were wallpapered and stairs were stained.  Customer loved the wallpaper but we only had three sheets of it for the six walls so we opted to leave the back walls white (which helps them not clash with the other rooms they flow into - on the first floor the back wall goes into the kitchen and on the second floor the back wall is seen along with the bedroom).  But we still had to creatively cut the papers to get the three sheets to cover the four remaining walls:


As you can see in the pictures above, customer also had us paint and install the french door onto the porch (as well as the white door on the front which was seen in previous post pictures).
Lastly, customer really wanted a fireplace in the living room but instead of just gluing the fireplace on the wall like the customer requested, we added a sheet of bricking behind it (with customer's approval) to make it more realistic (otherwise the wallpaper would have been seen in the fireplace insert where the logs would go).

Now, during this time while finishing up these last details on the Little Molly, I have also been working on several personal projects (pot rack, library ceiling, and finishing up the lower cabinets for the Butler's Pantry in the mansion) but none are quite finished yet, but as soon as they are I will be updating you on them!


Saturday, June 20, 2015

Celerity Little Molly

As much as I'd like to spend all my time working on my own projects, I still have customers' projects waiting for me at work.  There have been some quick little fixes (a Glenwood got some electrical installed, a roombox got reinforced with glue and supports, etc.); nothing exciting or worthy of photos.  Until I finished a customer's Celerity dollhouse yesterday!  It arrived in a mostly raw wood state (customer had assembled the structure and she had started to prime and install wiring before bringing it to us).
Exterior
Interior, first level had wiring installed and floor was primed.
There were minor issues with assembly: kneewalls in attic were installed backwards, roof was not flush in the back causing the front roof to not line up correctly, some interior walls were glued next to walls that they should have been glued flush in front of, etc. But this house is for a child and customer did not want to spend a small fortune having us remove everything to re-assemble/glue/nail it back in place correctly.  So we only fixed the top two issues that hindered finishing the house the way the customer wanted . . .
Kneewall was installed with angle facing the wrong way.
Front roof does not line up.
Kneewalls were pried out of the house, nails removed, cut the kneewalls down to fit (due to roof not being glued on properly), swapped sides and reinstall them.  But the front roof had to be removed, the front shaved off (which left a ridiculous 1/8" wide tail at the bottom overhanging which customer elected to have us cut it off), and then reinstalled.
KNEEWALL BEFORE
KNEEWALL AFTER
FRONT ROOF BEFORE
FRONT ROOF AFTER
The interior was to receive some wiring, wallpapers and paint.  One room was getting a chandelier (and the exterior was to get coach lights by the doors).  We primed, installed wiring, installed the wallpapers, and painted where customer desired.
Little Molly BEFORE

Little Molly AFTER

Attic Finished (with kneewalls installed correctly).

Bedroom with painted walls and accent wallpaper on back wall.

Living Room with chandelier.
The exterior had some broken and missing railing for the porches, and it was missing all windows and doors, and the customer wanted more of an "urban" look instead of a "Swiss Chalet" look (as it was pictured in the original instructions) so when picking out windows and color scheme, customer tried to keep it as streamlined and contemporary as possible.  We think the house turned out very cute and I know any little girl would love to play in it!
Little Molly Exterior BEFORE
Little Molly Exterior AFTER