Thursday, November 21, 2019

3rd time's a charm: Another Duracraft Farmhouse #500

I have been swamped with work, trying to inventory and pack up the brick and mortar shop as I transition to online only.  I was so busy I forgot to post this blog update when I finished it a month or so ago.  Oops!  The third and final Duracraft Farmhouse #500 for this year is done.  We were hired to assemble the kit to a shell stage (no windows or doors installed), cut an extra stair hole opening to the attic, and install wiring.

So many little pieces
Every wall had to be constructed one piece of 2-1/2" strip of wood at a time.  Very time consuming and incredibly flimsy wall structure.
Gluing the pieces together
One wall fully assembled
Luckily the walls fit into corner pieces which gave them some stability. But still feels flimsy to me.  It really made me realize how amazing it is that so many of these survived from the 1970s and 1980s!

There were also many warped pieces.  Most we could straighten or replace with similar pieces.  However, the porch support was a specialized piece, cut with a bevel and angle cuts on the ends.  Under our time constraints we had no choice but to use the warped piece.
This piece was warped side-to-side as well as up-and-down
With enough clamps, glue, and wood fill, it turned out pretty!
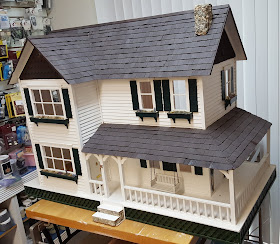
Ready for the customer to paint and shingle!
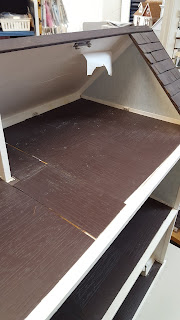
Interior has wiring put across ceilings and in some rooms at outlet level
Three more customer houses to complete before we go online only.  Realistically only two will get finished by our closing date in December.  The third one will most likely be finished at my house after we have gone online only.  There's just not enough hours in the day to do everything.

Tuesday, September 24, 2019

Past Projects: Roomboxes/Vignettes, Part 1

Summer brought a lot of changes to my life.  1. Two close family members ended up in the hospital with life threatening conditions; 2. my brick and mortar shop has announced it's closure; and 3. I am finally getting our basement finished!  Lots to share with you!

Long story short:
1. The two family members survived and are perfectly fine now. They only survived due to being in great shape.  I am not in shape.  So I need to make some life changes to be healthier.
2. Yes, my beloved miniature/dollhouse shop (Happily Ever After in Virginia) will be closing it's brick and mortar shop at the end of the year; Starting in 2020 we will be an online only shop.  No one shops retail like they used to, especially when it comes to miniatures.  I was sad about it at first, but am slowly realizing that I will be able to get back to what I love: creating miniatures! And I will be able to focus on making the website STELLAR (i.e. I will only have 1 full time job instead of the 3 I try to do now: brick and mortar shop owner, renovations/repairs, and website; it was all quite exhausting).

Now for the long story:
3. My basement (dark dank spider hotel) is finally getting finished!  In anticipation of this event I have begun to clean up and organize my miniatures.  Over the next 2 months they are slowly being brought up out of the basement.  And I want to document them before I either pass them along to others or box them up for the 3 or 4 month long basement renovation.

First up is my Tissue Box Vignette.  This "tissue box" kit by MiniGraphics was an ideal project 22 years ago when my newly married self lived in an apartment, and then in a townhouse with no yard, and I had to walk my baby dog multiple times a day.  It was made from foamboard or poster board to create a small space for a scene in the front and a lightweight cover for a tissue box kept in the rear. However, I never used it for tissues.  I kept plastic bags in it so that when I walked my dog I could grab a baggy for picking up after her.

Plastic bags sticking up, ready for use.
The outdoor scene was very appropriate!
And the dog lifting his leg gave everyone an idea of what the box is used for. LOL
Dog always cracked me up.

I haven't needed/used this "tissue"/doggy bag box in over 16 years now so it's time for it to move on...however, I am keeping that dog for a future project where he will fit perfectly.  So that's one project documented....only about 85 more to go. LOL

Thursday, June 13, 2019

Another Duracraft Farmhouse #500

Broken by movers, this Duracraft Farmhouse #500 was brought to us to be glued back together.
Doesn't look bad - just a few porch posts missing

So it didn't seem that bad at first glance.  Just a few porch posts and railing that needed to be reattached.  But at other angles and from the interior, more issues became evident...
Oops - yeah, the roof is missing above the jut-out double windows.
Oh dear, the entire wall to the right of the side door is missing.
There appears to be some interior walls and stairs missing
Luckily the customer had most of the missing parts and pieces.  We just needed to piece them back together like a puzzle.  Some pieces, like baseboard trims, were split down the center so we had to find the shards of wood to glue them back together.
Living room wall, shows not only the entire house being loose at joints, but also how baseboard near corner is split
Hit a bit of a snag when we did discover that the customer was missing one critical piece: a porch post.  Thankfully it was a simple block post and we were able to cut and paint it to match.  As long as we had to paint match, we also touched up some oddball mis-matched pieces (such as that one white porch corbel that didn't match all the other corbels).
New post on left, door in the middle, existing porch post with white corbel on right

All painted to match door
We glued the chimney and the corner porch shingles and trim on.  We fixed the front door (which was completely off it's hinges).  And now the house is glued back together, on it's base, with all missing parts and pieces properly put in place:

Roof, porch posts, and railing back where they had been! (I won't say back where they belong because whoever assembled this kit put some railings in different spots than where the directions say to put them.)
Interior walls, stairs, and exterior wall by side door are glued in
Stair back in and baseboard fixed; entire house glued back to base
And as odd as it was to work on THIS Duracraft Farmhouse #500 right after having finished up the white Duracraft Farmhouse #500 last month, nothing is as odd as having another customer bring her project in (a kit to be assembled to the shell stage) and it's (YOU GUESSED IT!) another Duracraft Farmhouse #500!!!!  What are the odds of that happening?  Apparently pretty good since it did happen.  So stayed tuned for yet another Duracraft Farmhouse project!

Saturday, May 18, 2019

Little Rehab (Duracraft Farmhouse)

Last summer we were hired to build and finish a Vermont Farmhouse Jr. kit (I know the title of this post is "Little Rehab (Duracraft Farmhouse)" but this is the back story of how we came to work on the Duracraft. Plus I have to post the pics of the Vermont Farmhouse Jr. now that I found them on my phone again! LOL).  The customer lived in California and her youngest granddaughter had recently moved to Northern VA.  It was to be a surprise birthday present.  Grandma had provided the other granddaughters with dollhouses but the family moved from CA to VA before Grandma had a chance to make one for the youngest granddaughter.
Vermont Farmhouse Jr.
Vermont Farmhouse Jr. Interior
We finished the house to the lady's specifications and it was then ready for the birthday!
I didn't post about it at the time because it was a simple, straightforward project and with everything else going on (Trade Show, school starting, etc.) the pictures were forgotten on my phone.

Until the California Lady called us a few months ago to say that she felt badly that the eldest granddaughter got a "fixer upper" many years ago at a garage sale.  Grandma had promised to fix it up with granddaughter when she was old enough to help; but they moved.  And with the other granddaughters having fresh new dollhouses, she wanted the eldest's to be spruced up to look as new as it could be. So Grandma wanted to know if she could have the house brought to us for fixing up.

The Duracraft Farmhouse #500 dollhouse was in pretty decent shape! (For a tiny bit more info on the Duracraft Farmhouses, read this previous blog post.)
Some window mullions and shingles missing
Up close photo of broken/missing shingles
Some wallpapers were beginning to peel off and some electrical wasn't working
Porch swing held up by velcro

Interior Floors are large laminate tiles cut and glued in place
We had to remove the old flooring and remove the old wallpaper.  Then we checked and repaired the electrical before installing new wallpapers and floorings. We also put the porch swing on hooks (it was previously held up with Velcro) and we put the doors on hinges: originally the front door did not open at all and the side door was on a Velcro hinge.  Missing window mullions were replaced.  And now the house is ready for pick up!

FINISHED: Exterior of house
FINISHED: Interior lights all working again; new papers in
FINISHED: Interior floors all installed
The interior is so much brighter, lighter, and airy feeling!
Replacement shingles are a bit darker than original but we were unable to find an exact match of paint
Up close interior photo
Up close interior photo of stairs
Up close interior photo
Last Up close interior photo
Porch swing now on hooks
So now we move on to the next customer's project...which, oddly enough, is another Duracraft Farmhouse #500.

Thursday, April 25, 2019

Cream, Greens, and Yellow (Victoria's Farmhouse)

Customer brought us her Real Good Toy "Victoria's Farmhouse" kit to assemble and finish for her.  We assembled, painted, shingled, and finished the interior.  Did not run into any real issues; just a clean, simple project to share with you!  Lots of pics (and some personal life stuff at the very end):

Started with the new year -- January was the painting and assembling month! My parents took the exterior pieces home to paint cream during the first week since space is limited in the shop.  They returned them painted and I started to assemble:
Pieces were painted ahead of time to give it a better finish once assembled

Almost looks like a house! LOL

At home during the first two weeks of January I painted all the trim bits and pieces (shutters and spindles for rails)

Shutters, hand rails, posts, and doors: some in Lemon, some Dark Green, some Light Green, and a few touches of cream color.

Painted and assembled windows too
In early February we hit pause on the project as weather and customer illness prevented her from coming in to pick shingle dye color and wallpapers....but by March we were back up and running with the project:
Shingling started...she picked my favorite: our Golden Oak shingle dye color

Roof is done - just need to put on the top row to match up with the back
Started to seal the wood floors and make templates of the rooms floors
Finished it up just before my kids' Spring Break started in mid-April.  Waiting for customer to get a moment to come by and pick up her little beauty!  Hope she and her daughter (who gave her the kit many, many years ago) are pleased to finally have it together and finished.
Exterior View Front

From the left where side access panel is located

Right side of exterior

Overall interior picture: papered, flooring, baseboards, and crown molding in all rooms

Side Access panel open
Here are close-up interior pictures of the rooms, starting with the top attic rooms and moving left to right down the levels:
Top left attic room: Little Girl's Bedroom

Top right attic room: Little Girl's Playroom/Nursery

Left Middle Level room: customer is not sure what this room will be (music room? study? sewing room?)

Right Middle Level rooms: background is Master Bedroom; Foreground is bathroom

Left Lower Level room: Parlor/Living Room

Right Lower Level Rooms: background Dining Room; foreground Kitchen
Now we have just started our next customer's project (a DuraCraft rehab) and hope to finish it up quickly in the next two weeks!

Personal Life (skip this part if you only care about minis!): Last week was consumed by my eldest teenager's Spring Break social life and my 10-yr old daughter's newest hobby (baking and cake/cupcake decorating).…
Decorating her Spring Cake

Decorated some Spring Cupcakes

And had to make some cupcakes for a friend's birthday too
Did I mention that I gained 4 pounds over Spring Break? LOL   And this week started with a family gathering for Easter at my house (which forced me to address the Elephant in the dining room (aka the Mansion)).  And now this week has been non-stop work practicing and preparing for my other teenager who is performing in her school musical Hairspray Jr. this weekend.
Dress rehearsal last night: My daughter is in the center, blue plaid dress, standing in "jail"
BUT after this weekend: I'm getting back to my Mansion!  Covering it up for my family's Easter dinner on Sunday made me so sad (but I had to protect it from all the nieces and nephew coming over) and it has motivated me to get back to working on it!  So all this Spring-time energy is going straight to finishing the exterior...right after I recover from Orthodox Easter this Sunday!