Saturday, December 31, 2016

End of the Year, 2017 Preview

2016 is almost over.  I tweaked a bunch of personal projects this year (I won't say "finished" or "completed" them because, let's face it, a miniaturist is never "finished" with any project -- I still add things to my House That Jack Built English tea house and my Artply Rutherford dollhouse which have been on display in my house, pretending to be completed, for over 15 and 20 years now.)

So, I don't want to look back -- 2016 was a rough year for a lot of people -- so I decided to look forward and preview some of what I'll be doing in 2017!

Besides the customer houses (have 2 in right now that I'm working on the electrical), I will be wrapping up my bread box by creating a bread rack...
Chalking up my breads

So happy with my loaves

And with my croissants

And Opie (my BJD Pukipuki doll I got from my friend, Wendy) is getting her house this year!  Well, the outer shell of it anyway -- I have such plans for this house that it will probably take me over a year to get it to be at a point where it can be on display.
Dad cut the base wood for Opie's House!

I will be tackling the Mansion (always working on the Mansion)!  Rumor has it that Dad has the addition base almost ready which means huge steps will be taken this winter on finishing the exterior of the house!

I hope to finish my 1795 Kitchen and to get my 1895 kitchen underway.  My in-laws gave me some cash for Christmas which I used to purchase this slightly moldy and neglected roombox which needs a back wall but will be perfect for a little Early Victorian Kitchen to complete my Kitchen Series roomboxes (1929 kitchen1964 kitchenBrief Touch on 2010 Kitchen, 1795 Kitchen and Start of 1795 Kitchen).
This will make a cute kitchen!

And I really hope to complete the Shark Tank (Birithmas Gifts to Finish Up) in time for the next Green Spring Gardens Holiday Open House in December 2017.
SHARKS!

My Hunting Cabin is very close to being "Display-able".  I mostly want to put it on a board and put landscaping around it...
Haven't touched this one since 2014!  It needs a bit of attention for it's debut!

Interior is mostly finished: just needs some final touches and accessories.

So, here's to 2017!  May it be a wonderful, lovable, productive, healthy year!

Thursday, December 22, 2016

(Non) Baking Bread

After using FIMO to make my pumpkins (Experiment with FIMO/Pumpkin), I decided I was more of an "air dry clay" type of girl. But I didn't know what type was best. So when I stumbled across some home-made, 3 ingredient, recipes for a bright white air dry clay for making Christmas ornaments I thought, 'why not use that in my mini molds to create breads?'

I mixed the baking soda, corn starch, and water (2 cups baking soda, 1 cup cornstarch, 1-1/4 cup cool water). And plopped it on the stove where it quickly went from liquid to mash potato consistency.
Liquid...
Finished when it's balled up in a clump
Put it in a bowl to cool...
Chillin' for about 20 mins
...and then started playing.

It was fun, but a lot of my pieces wouldn't come out of the molds nicely. They were dusted with cornstarch and releasing from the mold: sticking was not the issue. It was just my fat clumsy fingers were smushing the still soft clay while trying to pop it out of the mold. I needed to practice patience and give the clay 30 minutes to a few hours to set up before trying to pop them out.

Given the amount of time between filling the molds, I needed to store my clay to keep it from drying out. Into a baggie and the fridge for safe keeping! Over the next 3 days I'd pinch pieces off the clay ball in the fridge and fill my molds, let them set, pop the mold pieces, and repeat. Now I had an army of breads and a few other goodies!
My tray is looking full
I also made some eggs and a thin piece to break up to make egg shells to put around my Mr. and Mrs. Killjoy scene (Killjoys).  Also experimented with some pretzels and marshmallows and maybe smores (we'll see how that turns out). Time to color the breads with chalk!
My chalk sticks
Shaved some chalk off

Never having done this before I was annoyed by the q-tip falling apart after one chalk application.
Not working very well

I can't even get one loaf done and my "tool" is toast (no pun intended). So I started to use my fingers to rub the chalk onto the breads...

And they're turning out rather well, in my opinion!  Got to wait for them all to dry (these don't get baked) so I can color them all.  And now to order a few baker's racks to put all these breads on!

Thursday, December 15, 2016

Delayed Birithmas Gift...

Surgery and loss of miniature mojo set me behind schedule on my friends' Birithmas Gifts (First post about Friends' Birithmas Gifts) but I am back to finishing up the New Yorker Box for my TX friend...Making this scene in one of the windows:
2015 Christmas Window Display in NY City

Last step is the lighting.  Was planning on putting the light bulbs in the center crown hanging in the center for the Queen of Hearts Bergdorf Goodman window display.  So first I had to replicate the crown hanging above the doll.  Friend had found the perfect size crown during her trip to New Orleans and shipped it to me (along with her lions seen in the last photos of this blog entry).
Sprayed some glitter on the crown but it doesn't show up very well in the photo
Had to add the red velvet to the crown.
Cut the pieces
Super glued each piece into place


The underside still has the hole for the bulb/wire to light it up.
Unfortunately when I inserted the bulbs and lit it up, the bulbs weren't enough to light up the entire window area.  It created more of a spot light effect on the limited space under it, leaving most of the box in shadow.  So I removed the bulbs and just put them in the ceiling to light up the area.
"HI!" I'm waving at you in the reflection of the unlit room.

This side of the box is now lit but I think it still needs some lights at the bottom to better enhance the sparkles on my friend's lions.
Hanging crown, not lit but still an important detail touch to the scene.
So, I'll still add more lights near the bottom and the Tiffany side needs it's lights glued in place (Blog post showing the Tiffany's Side), but I got to play yesterday afternoon with my friend's Birithmas gift and spent the time altering a crown.  She won't get it in time for Christmas or even New Year's but I will hopefully get it shipped out by the end of January 2017...Does that mean I can count this as her 2017 Birithmas gift too? LOL

Wednesday, December 7, 2016

1929 Kitchen

So the Green Springs Garden event is over and all my roomboxes and miniatures are back home now.  As promised, here are the pictures of the 1929 kitchen, along with the history lesson:
The whole room
And the porch
So, this room really could have been 1930 just as well as it could be 1929, but I picked 1929 because of two time period indicators, and just to make it stick out in my kids minds (cuz remember I did this for the kids.  Yeah, right, for the kids!) about what a pivotal time period this was.

The first indicator is ELECTRICITY!  Homes now have it!  See that Monitor Top refrigerator on the porch?  Produced in 1927, these electric refrigerators were nick-named "Monitor Tops" after a Civil War ship named "Monitor" whose gun turret was cylindrical like the compressor on top of the fridge.  Refrigerators were expensive (many costing more than a Ford model-T car) until this GE Monitor top fridge came out.  And GE offered a payment plan so you would just pay an extra $10/month on your electric bill until the fridge was paid off.  Thus they became more common in the average man's household.

However, they were noisy and when/if a refrigerator had a leak (common among the lesser "knock off" brands) it was deadly.  The toxic refrigerants (sulfur dioxide, methylcholoride, ammonia gases) that were used inside refrigerators could kill everyone in the room if there was even a tiny leak. So, when possible, these refrigerators ended up on the back porch!
Washing in the corner

And there is a Maytag 1928 washing machine in the corner of the room! However, in researching I have found that some Maytag washers were electrical and some were gas powered.  I am pretending as though my miniature washer was one of the electrical models. I have also found that this washing machine was produced in 1927 and other websites indicate 1928.

So, the refrigerator and washing machine makes the year after 1928 and....
Can't see the knife in this photo because I accidentally forgot to put it on the table before I took my photo

...(second time period indicator!!!) the loaf and knife on the kitchen table makes it before 1930.  Although, really, the lady of this kitchen could just really like baking and slicing her own bread.  But sliced bread was invented (well, okay, technically the MACHINE for mass producing sliced bread was invented) in mid-1928.  Many bakeries did not trust sliced bread, believing it would get stale faster and because the loaves looked "sloppy" making them harder to sell. These concerns were addressed with packaging changes that included a pin thru the loaf ("just remove the pin to get however many slices you want" -- a selling feature that does not sound very appetizing) and wax paper wrapping (hard to see the loaf you are buying). So the "sliced bread" mania didn't really get rolling until 1930 when Wonder Bread created their own machine and started packaging and selling their sliced bread.
View of the cupboard
Sink still needs some brillo pads or something on that shelf -- I will continue to add to the scene through out the years...


So this kitchen is 1929 because they have the Monitor Top (but they don't trust it as it is relegated to the porch and they still get their milk delivered daily) and washing machine, but they still have to cut their bread as Wonder Bread hasn't convinced them that sliced bread is the best thing since...well, itself.


Thursday, December 1, 2016

Home stretch!

This was the final week before I take my miniatures to put on display at the FROGS Holiday Open House party. A lot of roomboxes got tiny details added or had items tweaked this past week:

The Knitty Kitty finally got its shop sign:
Blue bar up on top has no signage
Sign in place!

Thank goodness for scrapbooking stickers! Here are interior pics of the shop for anyone interested:
Looking down into the roombox
My yarn cabinet: I stuffed the space behind the yarn with filler tissue paper so I didn't have to buy as many yarn skeins
Bottom shelf is still empty in case I find a really cute knitting thing I can't live without!
My favorite: a stitched pillow from my friend Beverly and a sleeping kitty on a knitted blanket
Is it bad that I want to shrink myself down and sit in this rocker for hours? LOL

The Gamble (Las Vegas Casino roombox) got a real wooden counter for under the slot machines instead of the Christmas Box I had been using for the last decade or so...
Red gift box I had been using as a cabinet under slot machines
Got a wooden block and painted it black to look more realistic
My Vegas Casino is still missing an Elvis impersonator groom to go with my bride, but it gives me something to continue to shop for in the future...
Whole room before I swapped out the red box. Minsky Burlesque sign lights up but you can't tell that in the photo.

My husband and I have been collecting chips from the various casinos for years - I put them in the top of the roombox and enclosed them in plexiglass.

Finally took the time to hang my daughter's pictures on The Modern Museum walls.  My eldest daughter had created a wax creation in preschool 10 years ago -- it was already hung up before.  But my middle daughter created some modern art pieces a year or two ago by accident at a friend's birthday party (Followers of my store Happily Ever After remember that as I posted it at the time on Facebook).  Those pieces needed to be hung up in the museum:
Whole museum: eldest daughter's art in the center of back wall and middle daughter's art on either side of it on back wall
Glass pieces were arranged on floor and I hung my middle daughter's art on back wall

Pottery pieces on ebony block of wood with my eldest daughter's preschool work on the wall and her nail polish art piece on the floor in the center
Wood carvings on shelves and an art work up top by Jeannine Merrill Schrader
The 2010 kitchen got more accessories:
Overall 2010 Kitchen

Love the Twinkies -- remember the "scare" at the end of 2012 when we all thought they were gone for good?

Just got back from grocery store and picking up Starbucks and some McD's for lunch. Wonder what crock  pot meal she's gonna make for dinner!
Dog has nicer eating area than most humans: Cezanne art on the wall and silver dog dish holder!
The tile work backsplash is a sealed paper by World Market - for less than a dollar it was a great addition to my stove!  And it's kept so pretty and clean cuz most of the cooking is done in the microwave on the counter next to the stove.

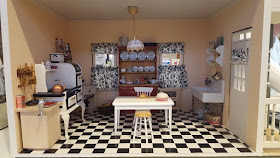
So it was pointed out to me that I offered extra credit credit for guessing why the 1929 kitchen is 1929 and not a nice round number like 1930 or 1925, but I never post a pic of the kitchen on the blog!  Technically I could have done 1930 -- the detail that makes it 1929 was still around (and more abundant) in 1930.  But 1929 makes this kitchen still in the 20s and the roaring 20s were a great time -- if you ignore all the health issues (Polio, anyone?), segregation/Jim Crow laws, the Great Dust Bowl, Prohibition/rise of organized crime, and the impending economic doom that is heading towards the country.  But let's ignore all that and romanticize the past!  Here's a pic of the 1929 kitchen...the history lesson will be in the next blog post!
1929 Kitchen, blissfully unaware of all that bad 1920s stuff